

Access the Goals page
To access your goals, click Settings > Goals. By default, Kameleoon includes the Retention rate goal for all sites associated with your account. This goal records the number of visitors who click at least once after landing on the first page of their visit.Create a new goal
If you have protected your website using an iframe, the creation of a goal in the app may not be possible.
Name and describe your goal

- Click New goal on the Goals page. The Add a new goal modal opens.
- Fill in the details Kameleoon needs to identify your goal:
- Name: A name for your goal.
- Project: The site the goal applies to, chosen from a dropdown of your site URLs.
- Description (optional): Up to 120 characters describing the purpose of your goal. This information helps you analyze results later.
- + Add tags: Attach one or more tags to the goal for later filtering.
- Click Next to continue, or Cancel to close the modal without creating the goal.
Choose a goal type

- Click tracking: Triggered when a user clicks on a specific element.
- Time spent: Triggered when a user spends a defined time on your site.
- Access to a page: Triggered when a user visits a specific page.
- Retention rate: Triggered when a user clicks after landing on the first page of their visit.
- Number of pages viewed: Triggered when a user views a defined number of pages.
- Scroll tracking: Triggered when a user reaches a certain percentage of the page height.
- Custom Goal: Target highly specific visitor behaviors by defining your own events.
- Data warehouse tracking: Sync events from Snowflake, BigQuery, or other external data sources.
- Ratio metric: Measure relative performance by dividing one metric goal by another.
- Select a card.
- Click Create to continue, or Back to return to the previous modal without selecting a type.
Click tracking

- With the Visual Editor: Select the interactive element you want to track with the graphical editor.
- Using CSS selector: Specify the CSS selector of the element you want to track.
- From an existing experiment: Track an element that was previously added in one of your variations.
- With the Prompt-based Editor: Describe the element you want to track, and Kameleoon generates the goal.
Kameleoon greys out the Prompt-based Editor option and marks it as not yet available, matching the scroll tracking visual picker described below.
Using CSS selector
-
In the Click targets field, enter one or more selectors, separated by commas.

-
Clicking + Add selector opens a dropdown with the same four methods: with the Visual Editor, using a CSS selector, from an existing experiment, or with the Prompt-based Editor, which stays off. Choose one to add another target using a different method.

Manually with the Visual Editor
-
An Open visual editor dialog asks “On which page (URL) do you want to track clicks?” and prefills the field with your site’s URL. Click Open Editor to continue, or Cancel to close the dialog.

-
The editor opens a split view: your live site renders on the left, and a Define click tracking panel opens on the right. Click each element you want to track in the preview area. Clicking an element:
- Adds a highlighted outline box around the element in the preview, confirming your selection.
- Auto-fills the panel’s Selector field with the element’s CSS selector. For example, clicking a button auto-fills a selector like
#pbx-btn-send.
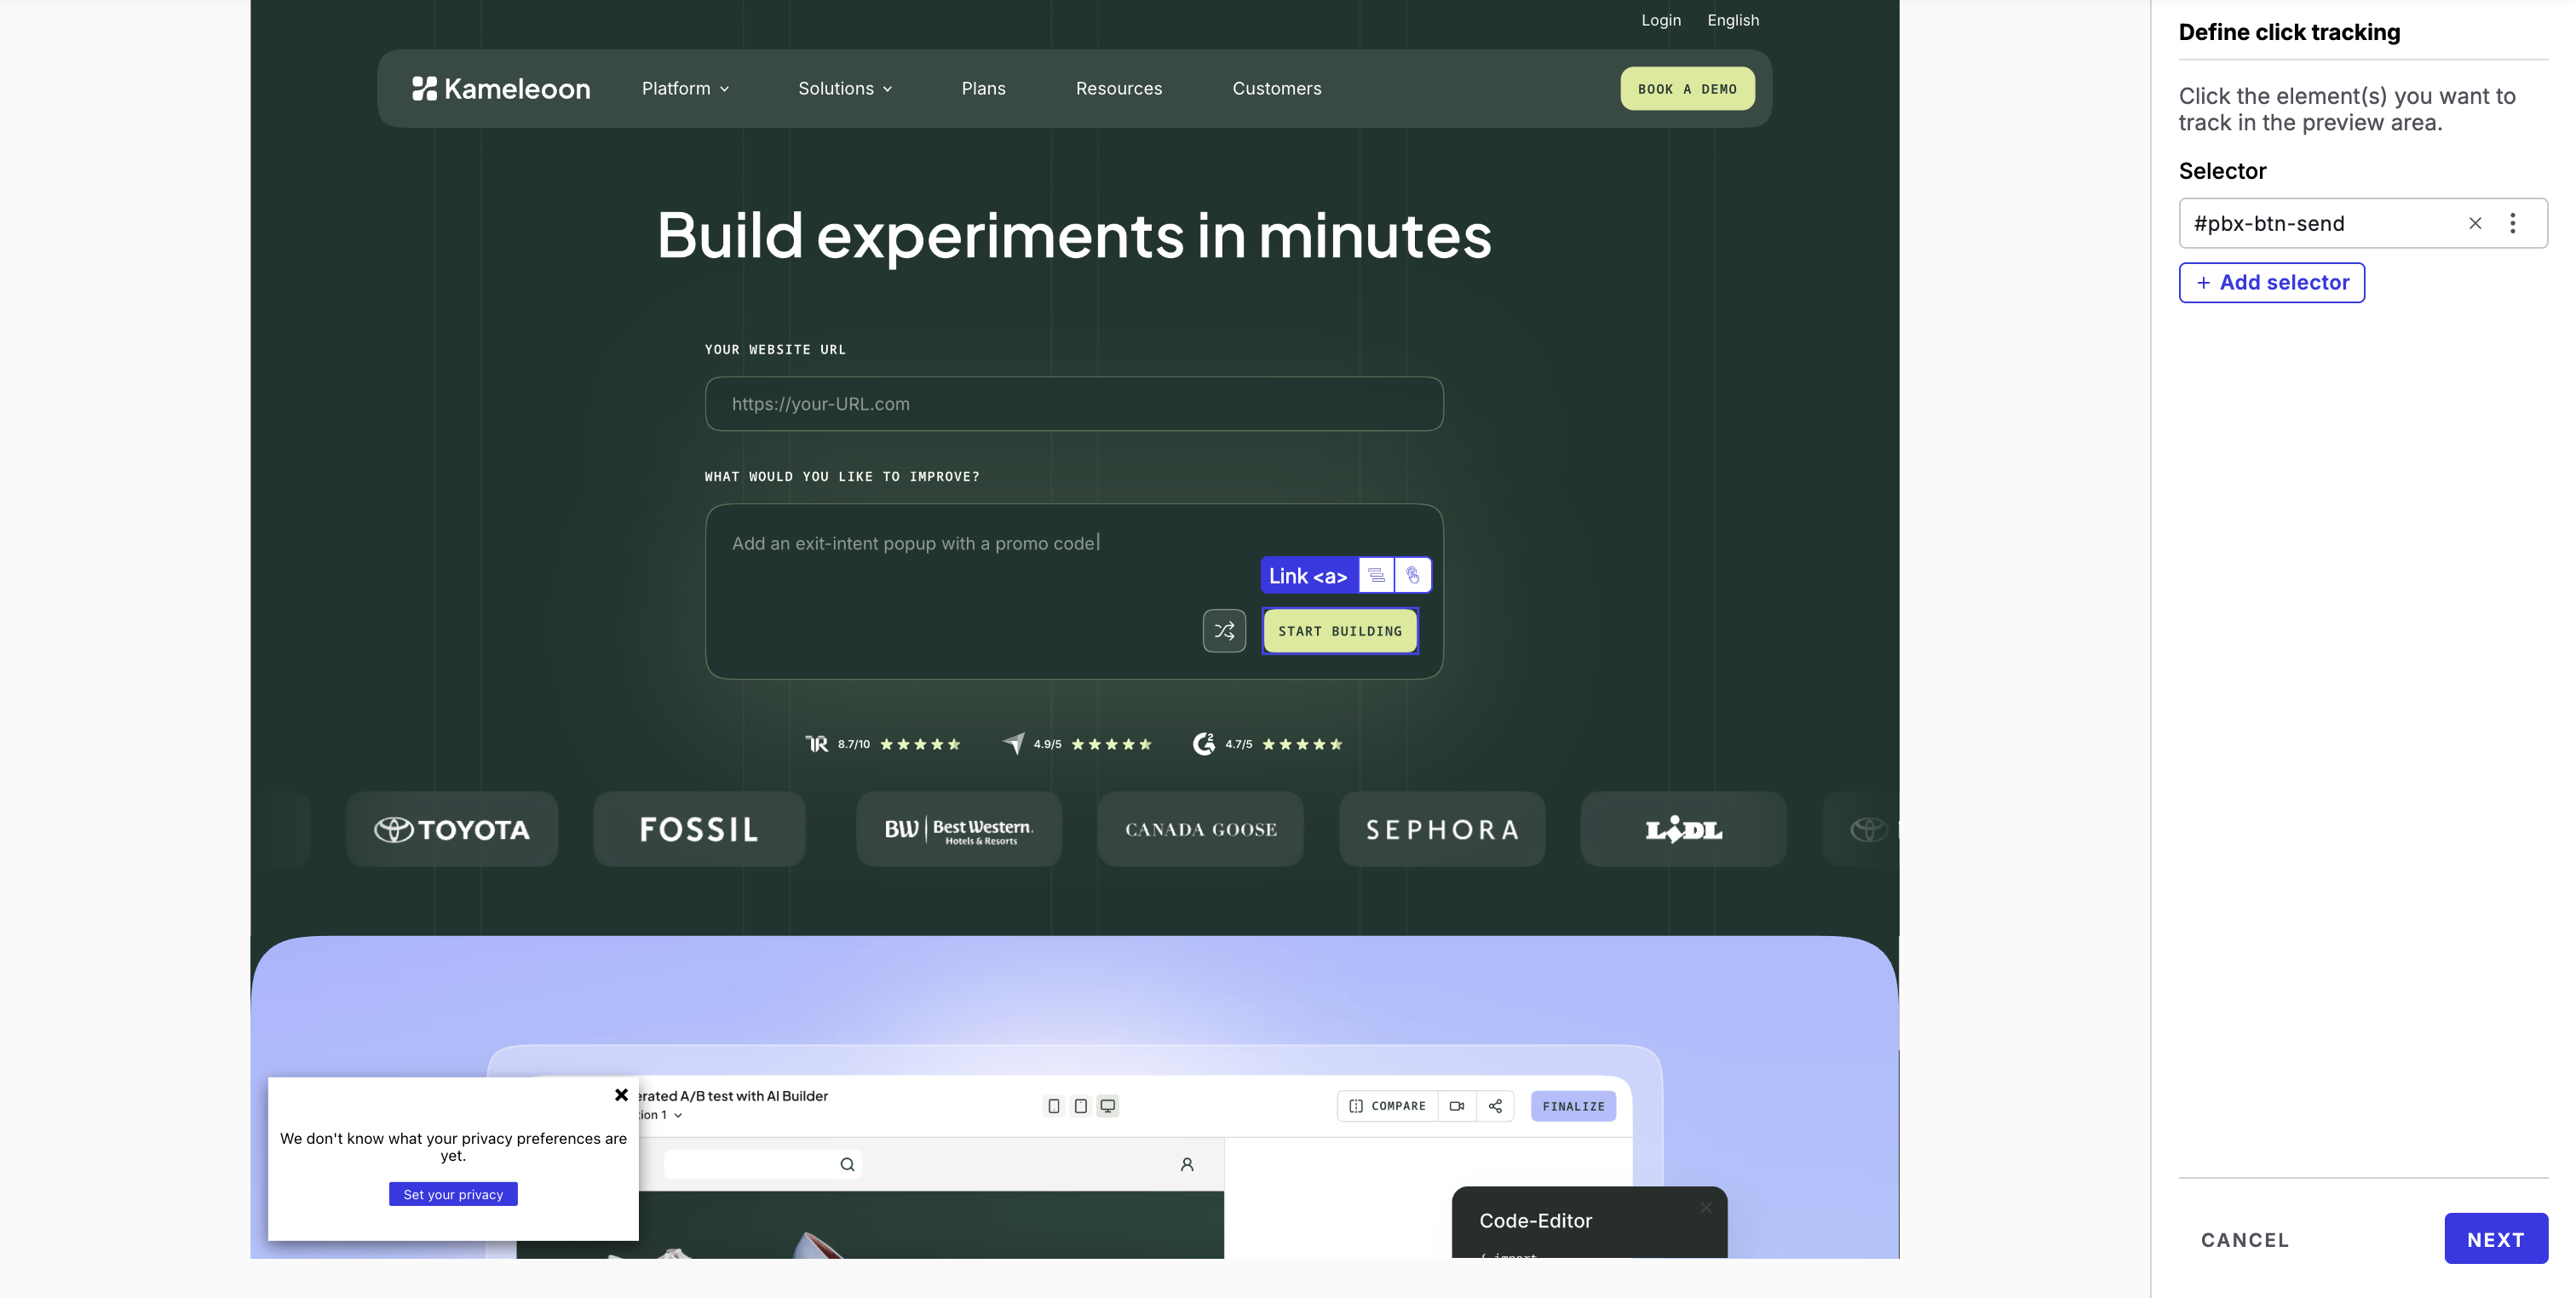
- Use the field’s clear (X) control or its three-dot options menu to adjust a selection, or click + Add selector to pick more elements. Click Next to save your selections, or Cancel to close the editor without saving.
Choose where to track this goal
Regardless of which method you use to define the target element, choose where the click counts as a conversion:- Anywhere on the site (default): Records a conversion whenever a visitor clicks the element. If several pages share the same CSS selector, every matching click counts.
- Only on specific pages: Records a conversion only when the click happens on a page that matches URL conditions you define. Selecting this option reveals a URL-condition builder: choose a match type (for example, URL contains) and enter a URL in the text field, such as
www.kameleoon.com/products/. Click + Add target URL to add further conditions.

If several pages share the same CSS selector, use Only on specific pages to scope the goal to a single page instead of relying on a page-unique selector.
If your server settings use the X-Frame-Options header to block your website from displaying in an iframe, the visual editor doesn’t display your URL, and you can’t add click tracking this way. You must change your server settings and add an exception for the
kameleoon.com domain and subdomains.Scroll tracking

Kameleoon greys out Visual picker and marks it as not yet available, so the selected-element mode described below stays manual-only for now.
- URL of the page: The URL of the page on which you want to create the scroll tracker.
- visitor scrolls down to: How Kameleoon measures scroll depth, chosen from a dropdown:
- the selected element: Visualize the elements of the page by hovering over them, then click the one you want to use as the scroll target. The level appears directly below the selected element.
- a precise percentage (default): Enter a percentage of the page height using the numeric stepper, for example 60%. The percentage measures from the top of the page: 0% places the level at the very top, 50% in the middle, and 100% at the very bottom.
- a height in pixels: Enter a fixed height in pixels using the numeric stepper. 0 pixels corresponds to the very top of the page, and the maximum height correlates with the page size.
If your server settings use the X-Frame-Options header to block your website from displaying in an iframe, the page preview doesn’t display your URL, and you can’t add scroll tracking this way. You must change your server settings and add an exception for the
kameleoon.com domain and subdomains.Access to a page
Enter the page a visitor must reach to convert. Choose one of three match types:- contains: Targets all pages sharing the same URL fragment.
- matches exactly: Targets only the page with the exact URL you entered.
- matches the regular expression: Targets a URL and its variations, according to the regular expression you enter. For help creating regular expressions, see Regular expressions.
URL fragments and regular expressions are case-sensitive.
https://www.mysite.com/products/product-1
Here’s how to apply an Access to a page goal for different scenarios:
- To a specific product page:
- Select matches exactly and enter the full, precise URL. For example:
https://www.mysite.com/products/product-1
- Select matches exactly and enter the full, precise URL. For example:
- To all product pages:
- Select contains and type in
/products/. Your goal then applies to all pages that include the/products/fragment in their URL.
- Select contains and type in
- For URLs with common variations (for example, “product” vs. “products”):
- If your product page URLs sometimes contain “product” instead of “products,” use a regular expression. For instance,
https://www.mysite.com/products*matches URLs containing either “products” or “product” at that point.
- If your product page URLs sometimes contain “product” instead of “products,” use a regular expression. For instance,
Time spent
Enter the time a visitor must spend on your website to convert. Choose a limit:- more than: The visitor must spend at least a given time on the page.
- exactly: The time spent must match exactly.
- less than: The time spent must not exceed a given duration.
Number of pages viewed
Enter the number of pages a visitor must view to convert. You can choose an exact number, a minimum, or a maximum.Retention rate
Kameleoon includes this goal by default for every new site in your account. The retention rate records the number of visitors who clicked at least once after landing on their entry page, so its Step 1 page needs no extra fields once you name and describe it.Custom goal

Option 1: Using a front-end event triggered by the JS Activation API
Choose this option if the conversion event happens in the user’s browser (client-side).- How it works: Kameleoon provides a specific function (
Kameleoon.API.Goals.processConversion(ID), whereIDis your goal’s unique identifier) that you insert into your JavaScript code. When the user performs the action you are tracking, your code executes this function to send the conversion signal directly to the Kameleoon platform.
Kameleoon generates the goal’s ID once you create the goal.
processConversion() method, see the Activation API reference.
Option 2: Using a back-end event via SDK (for example, Node JS)
Choose this option if the conversion event happens on your server (backend). This method is necessary for tracking actions that don’t rely on the user’s browser session (for example, successful payment processing). How it works: the Kameleoon server-side SDK uses a specific method (trackConversion()) to communicate the conversion event directly from your server to the Kameleoon platform.
Click the Copy icon to copy the SDK event code and pass it to your backend development team for implementation.
Code example:
visitorCodeis the visitor’s unique identifier you want to target.goalIdis the goal’s unique identifier.
Kameleoon generates the goal’s ID once you create the goal.
trackConversion() method, see the Node.js SDK reference.
Option 3: Using custom JavaScript code
Choose this option if you need to run specific JavaScript logic to determine when to trigger the goal. Custom JavaScript is the most flexible option and is useful if you need to dynamically calculate revenue or capture additional metadata before sending the conversion signal.- How it works: The code you enter in the wider code-editor panel runs automatically once your site is ready. Within that code, use the
triggerGoal()method to fire a conversion. You can also optionally pass revenue and metadata parameters.
For more information on using custom JavaScript code for custom goals, see Kameleoon’s developer documentation.
Alternatively, if you are initiating a conversion from a tag management system (for example, Google Tag Manager), use the Kameleoon Command Queue, which delays the command’s execution until the Kameleoon engine finishes loading. To set this up in Google Tag Manager:
-
Go to GTM > Tags > New > Tag Configuration > Custom HTML and insert the following code:
- Select the trigger that sends the goal conversion call to Kameleoon.
Kameleoon.API.Goals, see the API reference.
Data warehouse tracking

- BigQuery asks for a BigQuery project ID and a Region.
- Snowflake asks for a Warehouse, a Database, and a Schema.
- Databricks asks for a Catalog and a Schema.
- Redshift asks whether your cluster runs in Provisioned or Serverless mode, a Redshift cluster ID, a Region, and a Database.
- Use BigQuery as a source
- Using Snowflake as a source
- Use Databricks as a source
- Use Amazon Redshift as a source
Ratio metric

Metadata

What’s metadata?
Metadata are additional properties attached to a goal conversion. They let you filter or break down your results by specific values (for example, payment method, delivery type). For example, if you want to track how many “Purchase” conversions happened with each payment type, you can use metadata to capture that value.Using metadata
To use metadata:- Define a custom data. For more information, see Create custom data.
- Link the custom data as metadata when creating or editing a goal by selecting it from the dropdown.
Kameleoon won’t consider custom data marked Use this data only locally for targeting purposes, because it doesn’t send that data to its servers.
Advanced settings
Step 2 of the Define your goal page, Advanced settings, becomes available once Step 1 shows a green checkmark. It has three sections, Properties (which includes outlier handling for Custom goals), Usage, and Data sharing.
Handle outliers
This option is only available for Custom goals. More about Winsorization at KameleoonUsage
Three toggles control who can use the goal, all off by default:- Make this goal only available for specific experiments: By default, this goal is available for all experiments. Enable this toggle to select which ones can use it.
- Make this goal only available for specific personalizations: By default, this goal is available for all personalizations. Enable this toggle to limit which ones can use it.
- AI Predictive Targeting: Trains a model on this goal at the key moments you define, to target visitors by their likelihood to convert. Enabling this toggle reveals an Add prediction trigger button. Click it, then select the triggers you want to enable. More about triggers
Data sharing
Select which integrations should receive data when this goal converts. A live “N integrations selected” counter tracks your selections, and a “Can’t find it? Browse integrations” link opens the integrations catalog if none of the listed options match.Google Analytics 4After you set up the integration in Kameleoon, Kameleoon automatically sends goal conversions to GA4. GA4 doesn’t need additional configuration to receive them.Each goal conversion appears in GA4 as an event with the same name as your Kameleoon goal. For example, if you name your goal
Purchase complete, it appears in GA4 as a Purchase complete event. Each event includes the following parameters:type: the goal type (for example,CLICKorCUSTOM)id: the Kameleoon goal IDsource: alwaysKameleoonrevenue: only included when you pass a revenue value with the conversion
dataLayer rather than sending them directly to GA4. You must configure a GTM tag and trigger to forward those events to GA4. The dataLayer is also a useful place to verify that goal events are firing correctly before checking GA4 reports. For setup instructions, see Google Tag Manager.The goal summary page
Saving a goal takes you to its Summary page, where you can review the configuration you just set and continue managing the goal without returning to the Goals dashboard.
- Insights: the goal’s performance data, including key metrics, a daily events timeline, and impacted campaigns. For details, see Goal reporting.
- Summary: the goal’s configuration, selected by default right after you create the goal.
- Definition: the triggering condition you set in Step 1, plus any metadata attached to conversions. Click Edit to change these settings.
- Usage: the toggles you set in Step 2 that control who can use the goal, plus a Set this goal as your project primary goal toggle that defines this goal as your project’s main success metric. Only one goal can be primary per project. Click Edit to change these settings.
- Data sharing: the integrations you selected in Step 2 to receive data when the goal converts, or No data sharing tools if you didn’t select any. Click Edit to change this setting.